

Post by keith on Oct 5, 2015 19:48:55 GMT -5
Like Bill's this is re-post of a DIY for the SML Home Gunsmith. It's got some extraneous narration since it was originally posted over the course of several months of back and forth travel. I'll try and go back and edit it out as I have time this week:
In support of the premise we should do more and talk less I decided to post a working thread. I am on some forced leave because of a new policy that limits the amount of leave one can accrue; that said I am not entirely off because I will be at work TUE to THUR but hey, it all works out on paper to burn these days off. I am a lot like my Border Collie and become neurotic without things to do so I have been on a work bender over the last 4 days. Being it was the weekend I re-finished a sewing desk for my wife and built a blanket ladder (you can thank Pinterest). I'll spare you the photos but, overall, it allowed me the freedom to have the weekdays to myself to complete my own projects.
This project is way over-due but I am gone a lot (Sorry, MTJ555 I know you have it worse right now) and I have to work on things every few months as I can. I chose to call this project the Green Beanie (they will understand why) in tribute to the two men who have made it possible. Matt is a local retired guy who has a gunsmith shop up the road and gives me free run of the place to do things I don't have tools for at home. Mike is a friend, brother in arms, and an artist with metal: more to follow on that when I post the complete project. I don't get to see him as freely as I would like but he has been inspirational as a man and artisan.
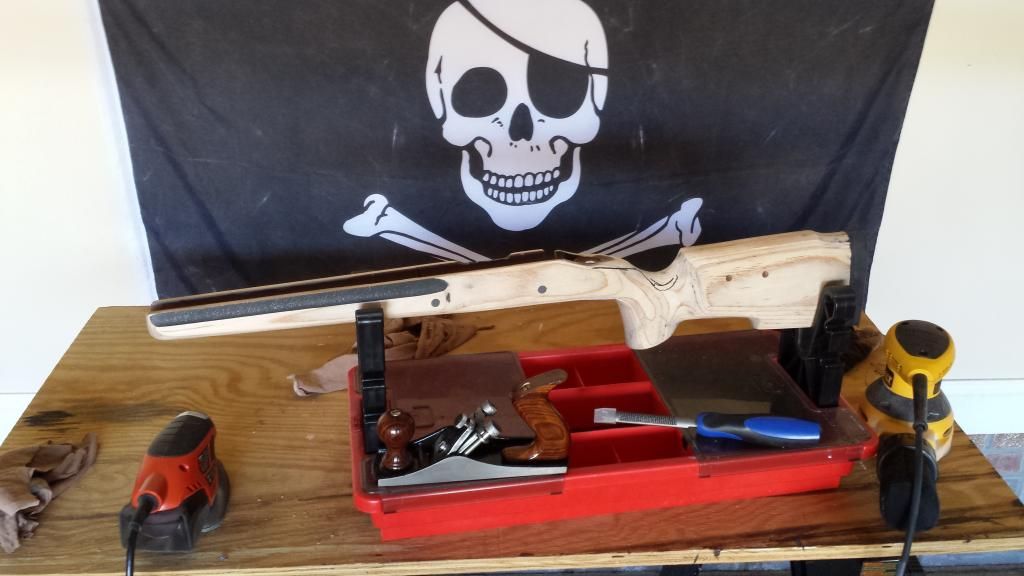
My wife bought me a Tacticool for my rimfire trainer an X-mas or two back. I really like the stock and bought one for this SML. The more I shoot the Tacticool the more I realize it is not quite right for me. The grip is too much and could stand some more taper from tang to wrist. The forearm is beaver-tailed and too fat for a psuedo-sporter. The Tacticool barrel channel is for a Varmint/Sendero channel and as a result left a unsightly gap around my barrel. I used a modified Douglas 5A contour on this gun so I taped the barrel and full-length bedded the gun so that when the tape was removed I had .040" of float from the recoil lug forward. To reduce the forearm I used a plane and cut the beavertail down parallel to the top edge of the forearm and all hard edges were radiused. Using the McMillan ADJ GameScout I am smitten with I sketched the reduction in the stock tang/wrist area and began to work it down with a rasp (not a great tool for laminate as it is very "chippy"). I changed over to a cabinet maker file and orbital sander. The comb is too low to allow for a good cheek-weld using a 20MOA off-set base and low Night Force rings so I molded, cut-down, and sanded a cheek-piece from Multi-Cam Kydex with an American flag to keep in tradition with the rifle's theme. Once I had it close to completion I mounted it on the stock and drilled the hardware holes though the Kydex and into the stock.
I am not anywhere near done but it was time to take a coffee break and eat second breakfast. I still need to clean up the bedding: I am headed to Matt's place at 1PM to use a mill for the chore. I still need to epoxy in the cheek-piece bushings, QD Push-button inserts, and bi-pod m1913 rail bushings. When all the prep-work is done I will primer the stock, cut the stencils, and paint the entire stock to match the cheek-piece. Was this the easiest way to get what I wanted? Absolutely not. Ordering another GameScout would have been much easier but like Bill said the other day some of us are diseased.
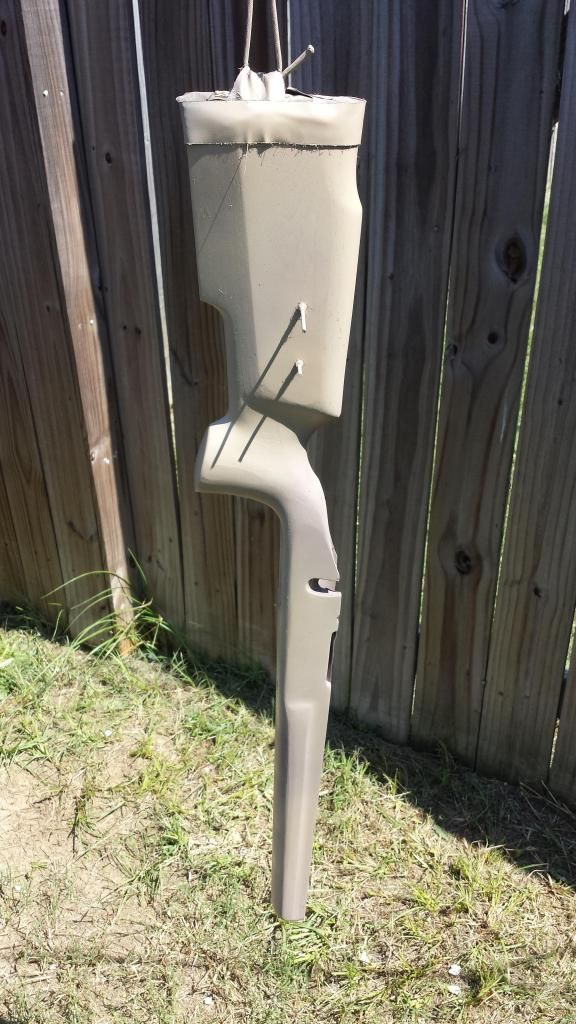
Tacticool stripped of textured black paint, drilled for hardware, bedded, and ready for shaping (note: you can see where the stock has cross-pins and you can't see it but at the bottom of the pistol-grip there is another plug where they epoxy a pin into the grip just like you should in wood vertical grip stock which checked off one item from my to-do list):
The bedding before clean up (the overflow was allowed so I had proud material to allow for the reshaping of the grip and to allow for a better fit of the ejection port cutout in the stock as it left a lot to be desired). The stock was ordered as an ADL since they don't offer a 40-X inlet and they only do a 700ML in a thumbhole so the mag box cutout was filled with cutdown carbon arrows (which I have broken while stump shooting with my longbow) and everything epoxied in place:
Rough sketch of grip reduction to occur and holes for cheeck-piece hardware (the comb on the Tacticool is too low for a 20MOA base with low NF rings):

Kydex cheek-piece (only .080" thick so as not to remove eye far from center-line of comb):

Tacticool in relation to GameScout which it is going to resemble soon:

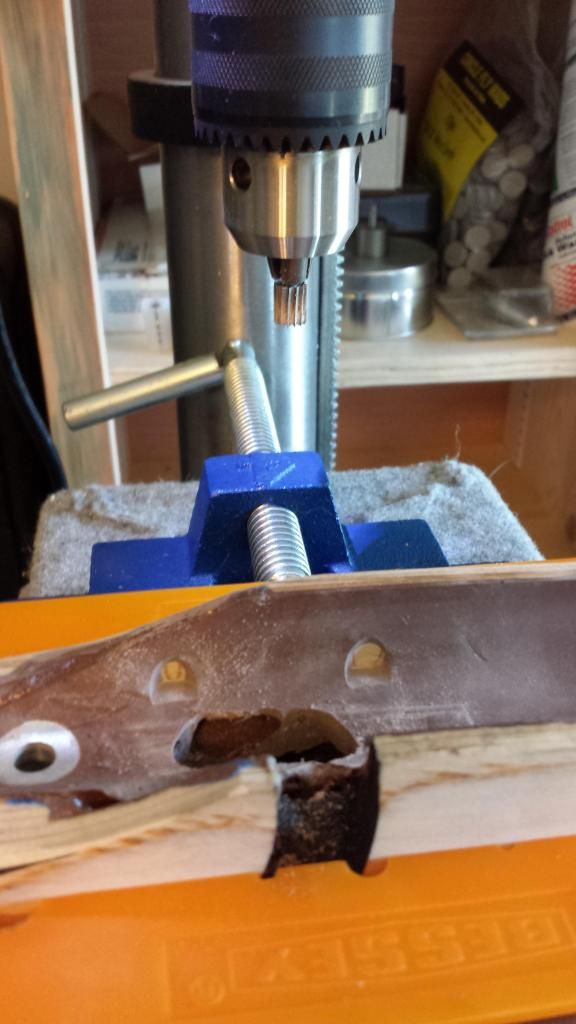
I posted yesterday I spent the afternoon on the phone with insurance companies. As a result I did not make it up to Matt's shop to clean up my bedding job. In addition to running his own shop he is a gunsmith instructor at Montgomery County College (one of the five NRA certified gunsmithing colleges if anyone in NC is interested) so I work around his schedule. That means I am cleaning this up at home. I have a meeting I have to get to this evening so I only had time to cut out the trigger pin recesses this afternoon after I got home from the body shop appraisal.
You can see little pock marks where the trigger pin holes were filled to prevent a mechanical lock. They are ugly so I cut them out. Honestly, I don't know that it is necessary but it looks better:
Since I didn't have his mill I used my drill press with drill press vise and a router bit. I line up where I want the recesses and use the depth stop on the press to make as uniform a cut as possible. I make a small cut, again and again, to the desired depth so that the bit doesn't walk:
Things have slowed down a little on the gun. I got to work yesterday at 4AM and returned home last night around 2AM. When my wife got up for work at 6AM I got back up, made coffee and breakfast, then let it all settle while I watched a movie.
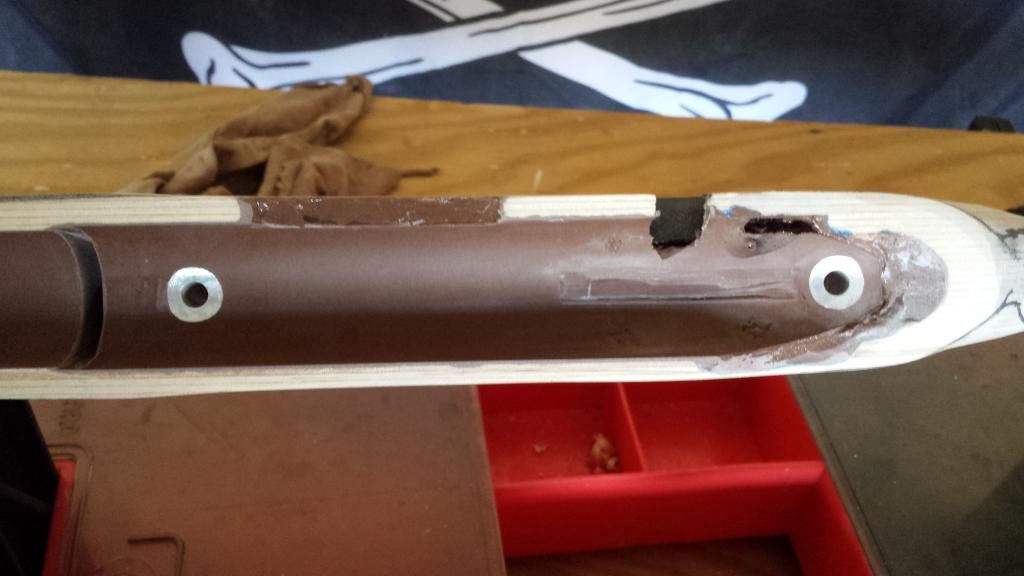
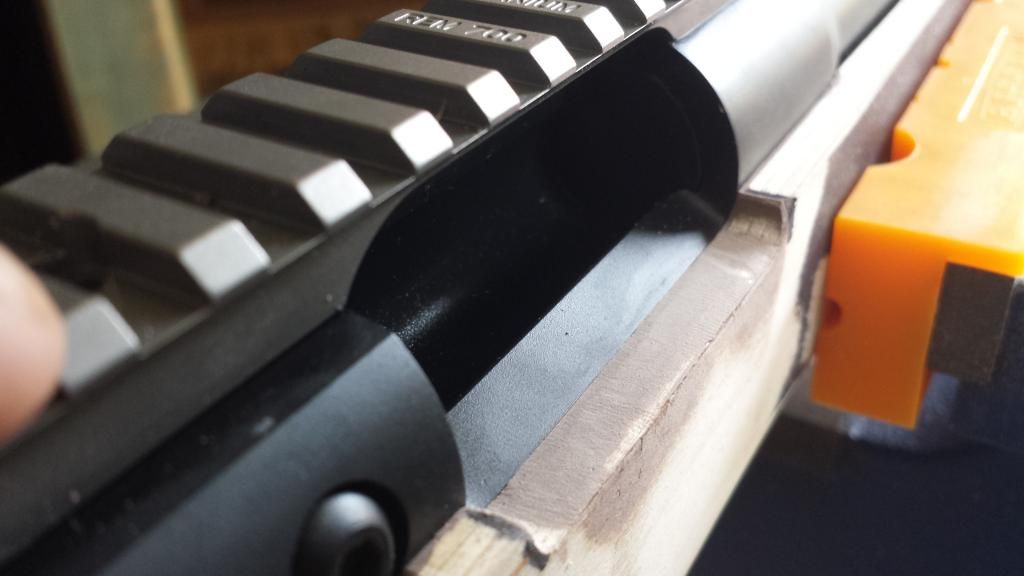
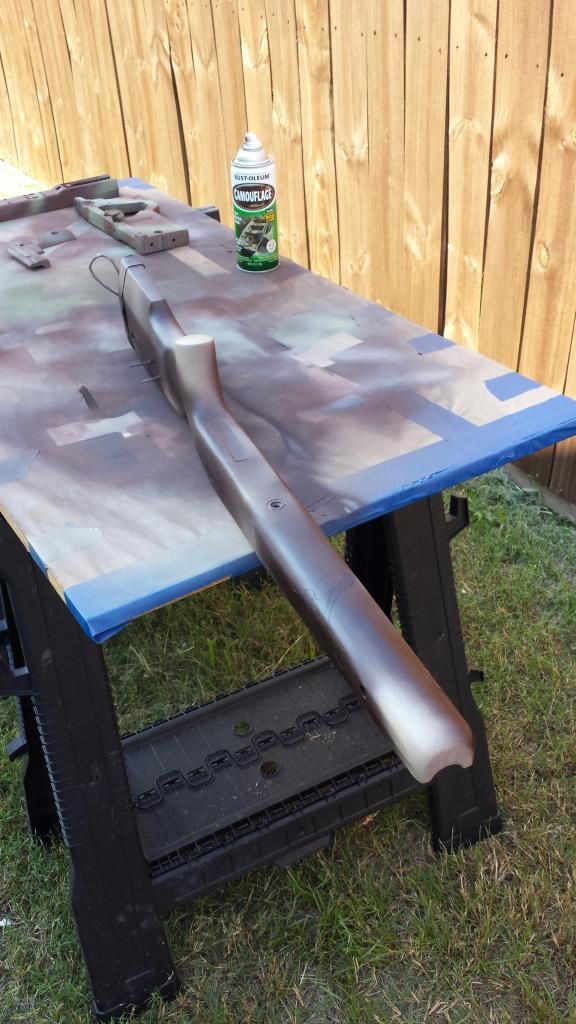
I got back to work on the gun around 9AM starting with cleaning up the barrel channel. I mentioned I wrapped the barrel with tape and full length bedded it to fill the barrel channel which was a gross mismatch for my contour. You can keep good tight wraps on the barrel shank and straight taper but the radius just forward of the breech gets little wrinkles and there are fine lines where the wraps of tape meet along the length of the barrel. So I put two wraps of tape the entire length of the barrel and took a strip of 150 grit aluminum oxide cloth, tightened the action down and cut back the barrel channel bedding just enough to remove blemishes then prepped it for paint.
I also removed the proud bedding material along the top stock line where the ejection port cutout formerly was a poor fit:
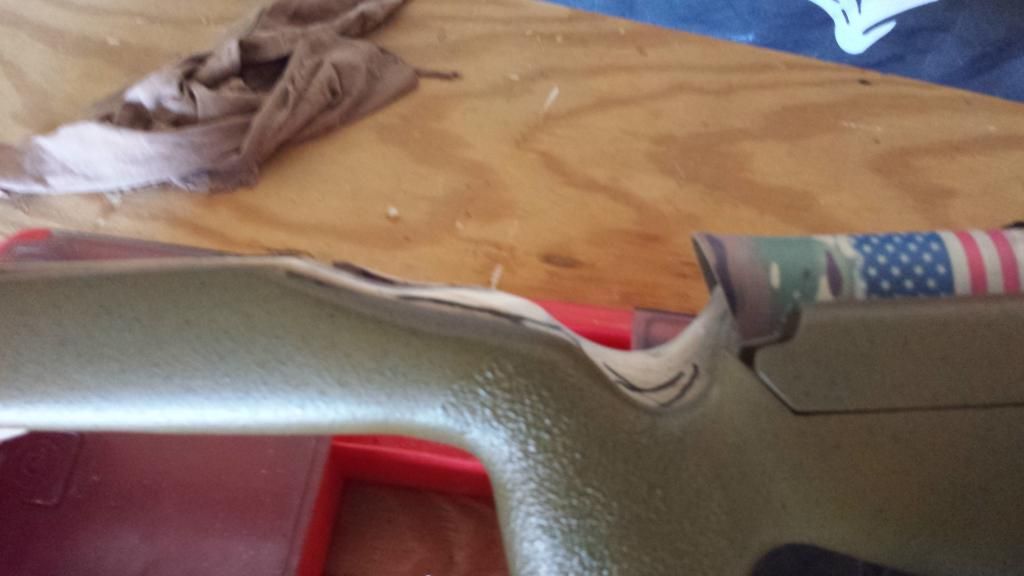
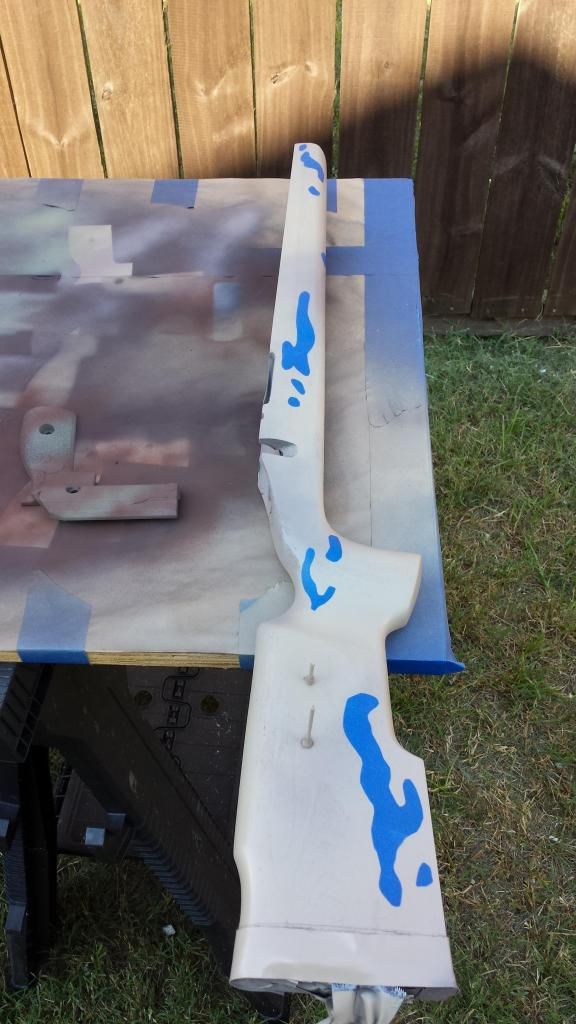
Grip Reduction complete and blended with the angle of the tang:
I decided not to dish out the "thumb flute" (if you will but it is not a flute in the traditional sense but it is not the wrist either) as it looks awfully thin once the grip/wrist reduction was finished. Thumb-holes are thinner I believe but they remind me of an H-brace in a fence and I think they probably distribute the recoil force better. Regardless, I stopped once it felt good enough to quit.
A few weeks back I received my breech plug tool from airborneike. Today while I was waiting on some epoxy to set I worked the BP shoulder over. I used three different cameras trying to get a good picture. This is the best I got for my efforts and shows an evenly polished shoulder:

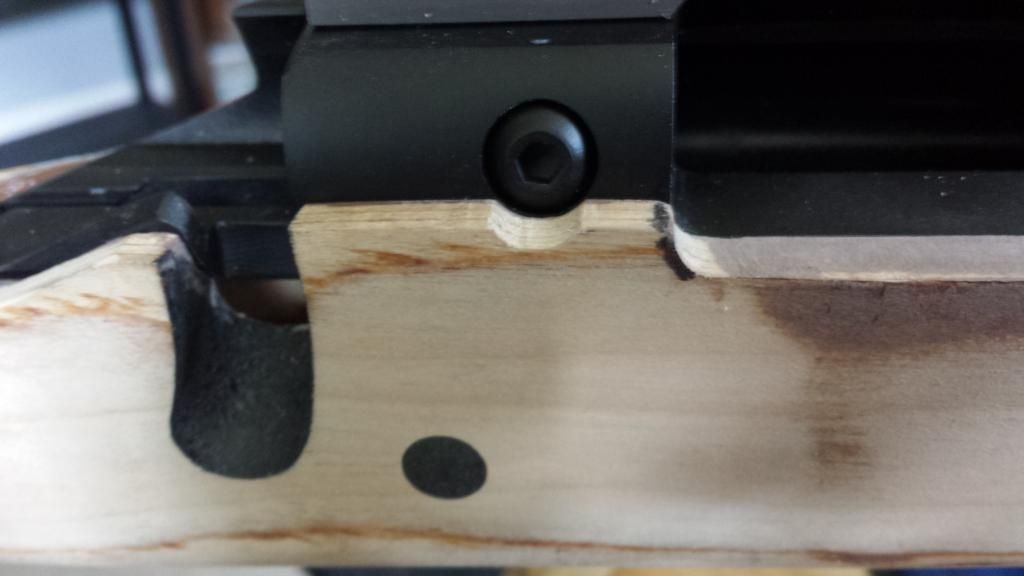
Today's my birthday and I have been lazy most of the morning but my wife is priming and painting a desk so I decided I would do some more stock work. Here is a push-button swivel insert and swivel next to the cheek-piece. I off-set it to the upper portion of the stock because if you don't the gun will tend to tip away from you when slung because the barreled action and optic make them top heavy:

I learned that the hard way when I ordered them pre-installed on the McMillan:
The forward insert is 13" ahead of the triggerguard and lines up with where the insert in the M1913 rail on bottom goes for the bi-pod mount:

Ok, three weeks of school later I am finished and able to do something enjoyable. It's time to paint the stock on the Green Beanie. I masked the bedding, recoil pad, and plugged the threaded inserts for the cheek-piece so we don't get paint anywhere I don't want it. I then used a paint and primer color that is a grey/tan/slate color with a slight pink hue. It is a good base color for a Multi-Cam type pattern:
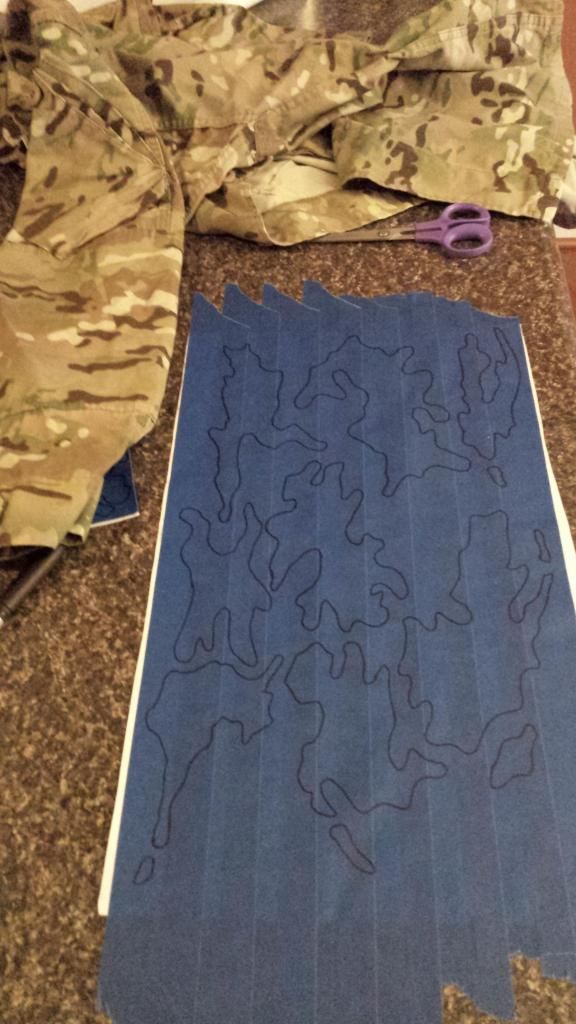
While it is drying I took a piece of wax paper and taped it so that the taped over lapped and drew my stencils:

Once the primer/paint combo dried I faded a flat tan into it in patches. I don't know that you can tell in the picture:
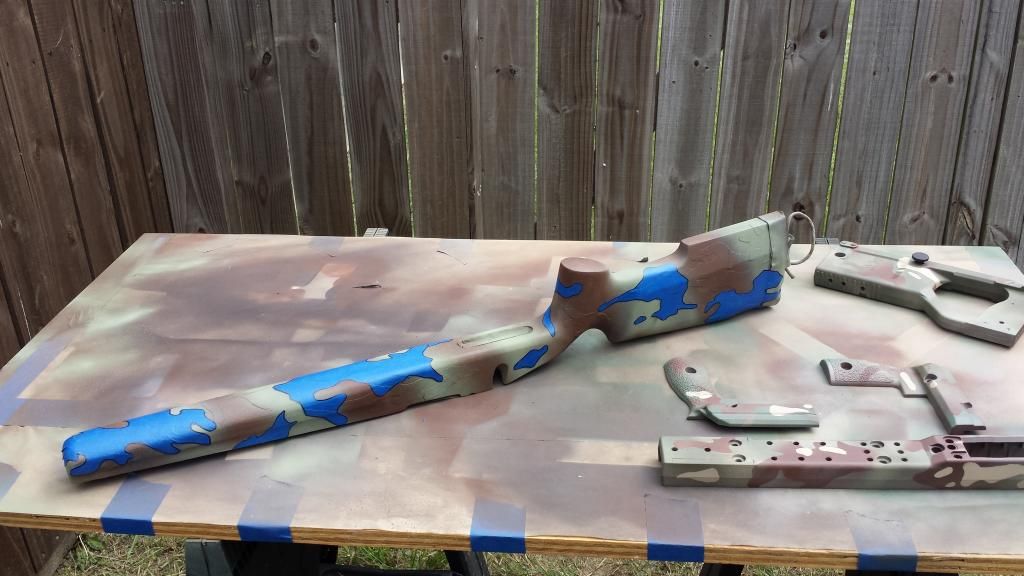
To create light spots I lay in the decals and then paint over them in a dark brown as they should be grouped together:
The blue decals will be dark chocolate colored and are paired with the grey/tan color from the picture above. I just did the reveal on the match rifle skins and they are sitting next to the Green Beanie stock. My dark brown paint wasn't playing nice with the plastic of the skins so I am going to have to go back and add it in but the Green Beanie should finish up similar to those skins.
I am going to let the brown dry overnight and tomorrow I will do the last two coats.
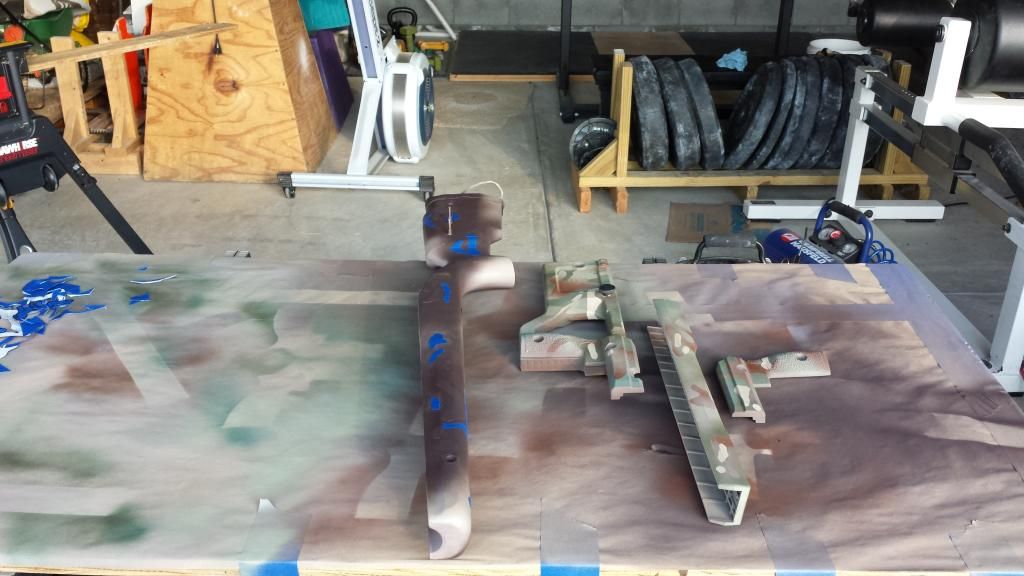
To get the mid fade you need a light loam green and a red brown color. The goal is about a 50-50 coverage running in stripes that have some fade to them. I run them at a diagonal so that when I come back for the next coat I can run the other direction (criss cross) to achieve a non-polarizing effect:
Now that we have a micro detail in light grey/tan and dark brown and macro detail in loam green and red brown we need larger pattern stencils:
Thanks for the compliments guys. My wife says this looks really tedious but I get in the zone and it seems to go by quickly. I only work on it for a few minutes at a time then wait a few hours and have another go at it.
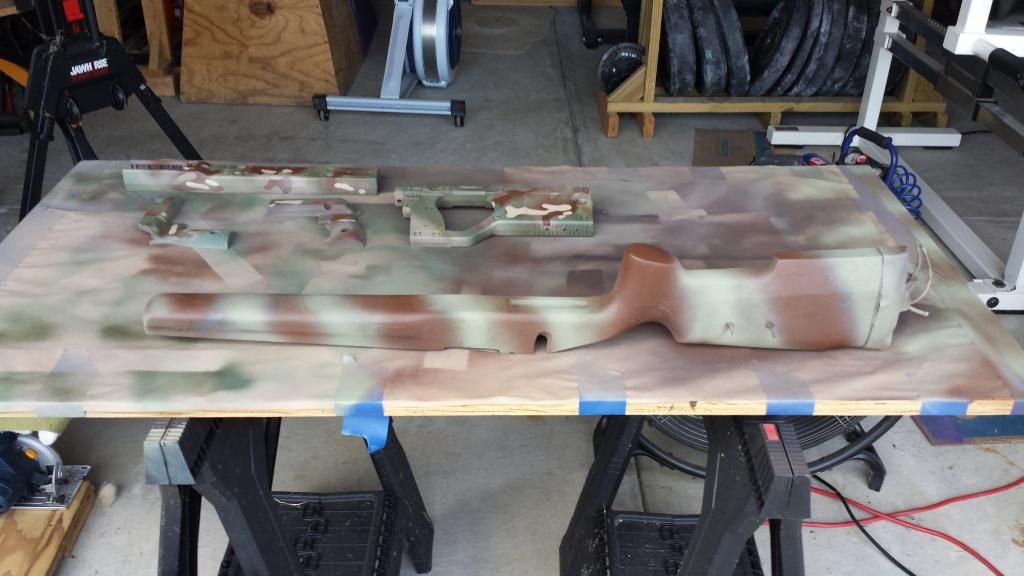
Macro detail in place over mid fade:
And final fade is tan, olive drab green, and another weird but slightly brighter loam green:
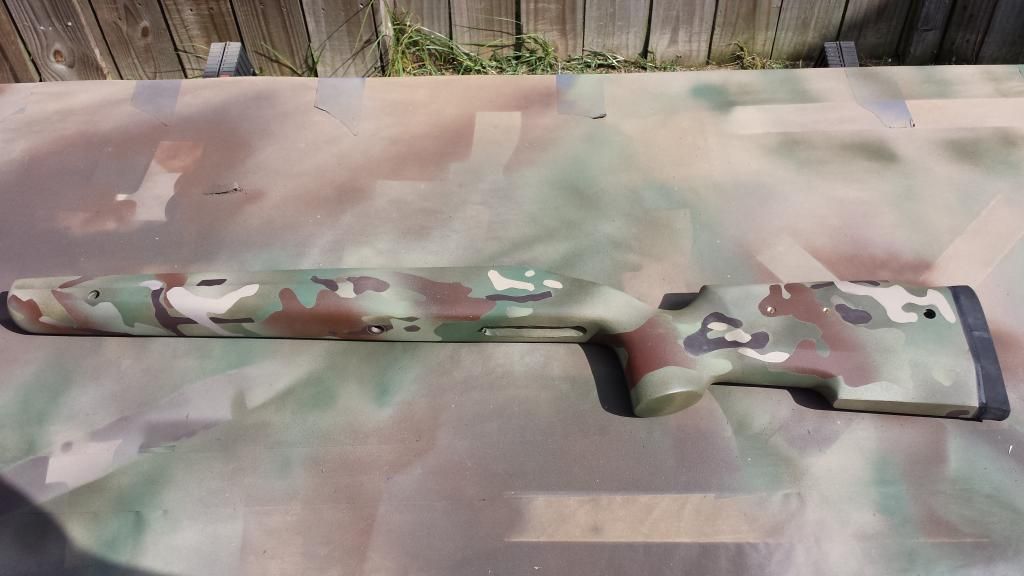
All decals removed you have something that looks similar to Multi-Cam:


Now, I am clear coating it to flatten out the shine and protect all the edges where paint colors come together and have a tiny seam. After that I will un-mask the bedding.
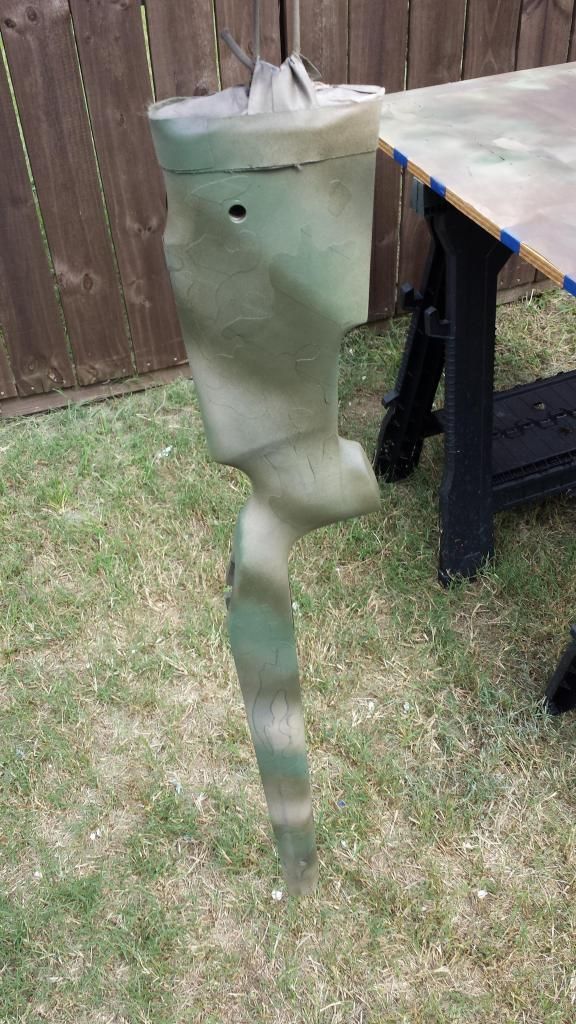
All the tape is gone and the stock is matte clear coated. Just needs to sit in the garage a while to ensure that the paint is completely dry and tack free:

The Green Beanie is finished.
Quick Re-Cap:
Remington 700ML with Hunter Bolt Nose Kit
PT&G .187" stainless lug
McGowen CM 1-24" .442/.451" barrel in a modified Douglas 5A contour crowned at 23", threaded for a muzzle-break
Trigger is blueprinted factory and adjusted to 2.25#
All CM parts are finished in Graphite Black Cerakote
Scope base is Murphy Ti 10 MOA (Devcon bedded, screws siliconed and torqued to 25 in*lbs)
Boyd's Tacticool (modified and pillar/glass bedded)
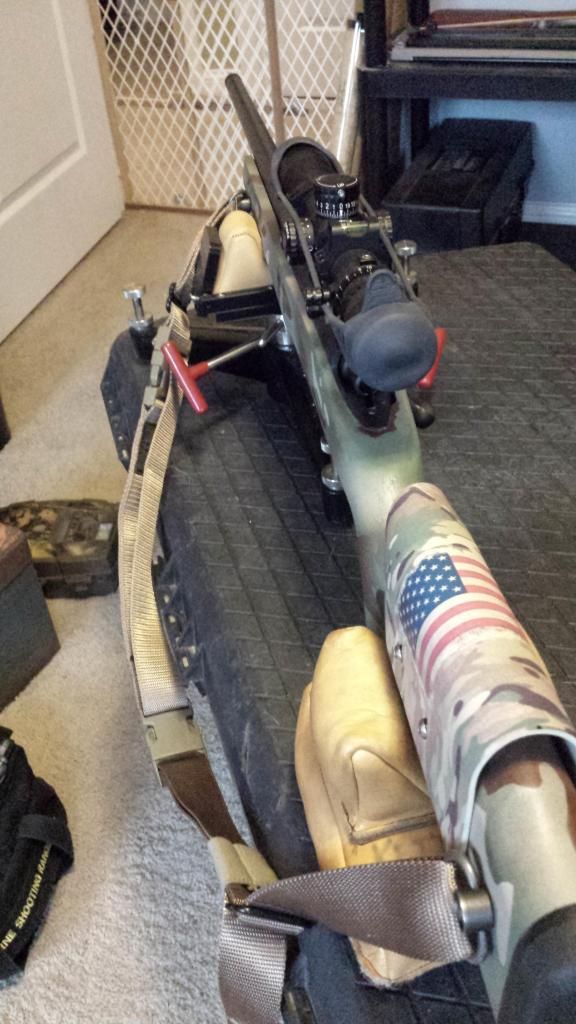
Sorry for the poor pictures but the weather is terrible this morning and I didn't feel like getting wet or cleaning guns that got rained on. Here it is on the benchrest equipment. The rifle in front of it is there because in all of the pictures of the Beanie's stock you could see the skins from that chassis getting painted as well:

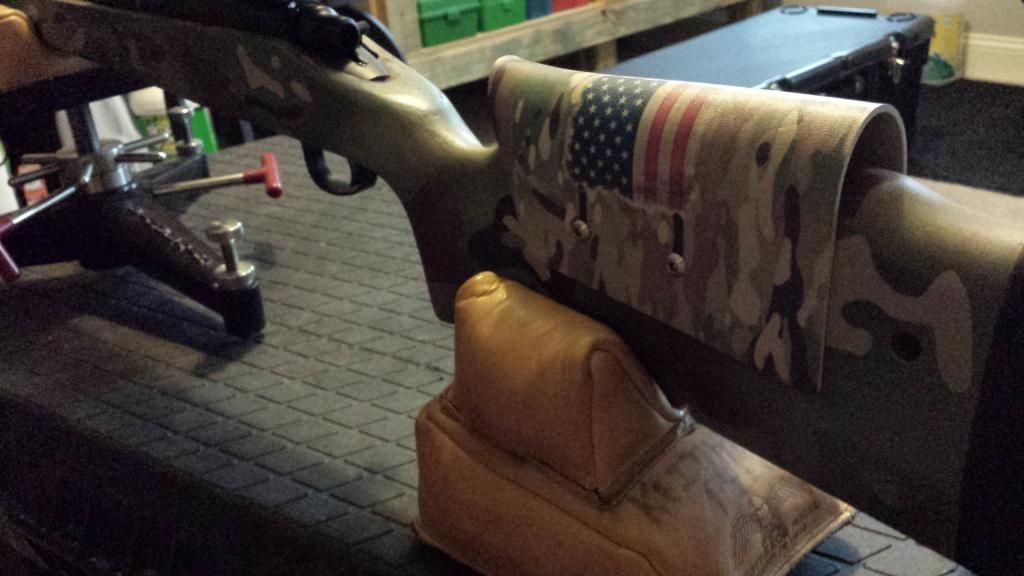
Cheek-piece mounted and Push-Button QD insert:
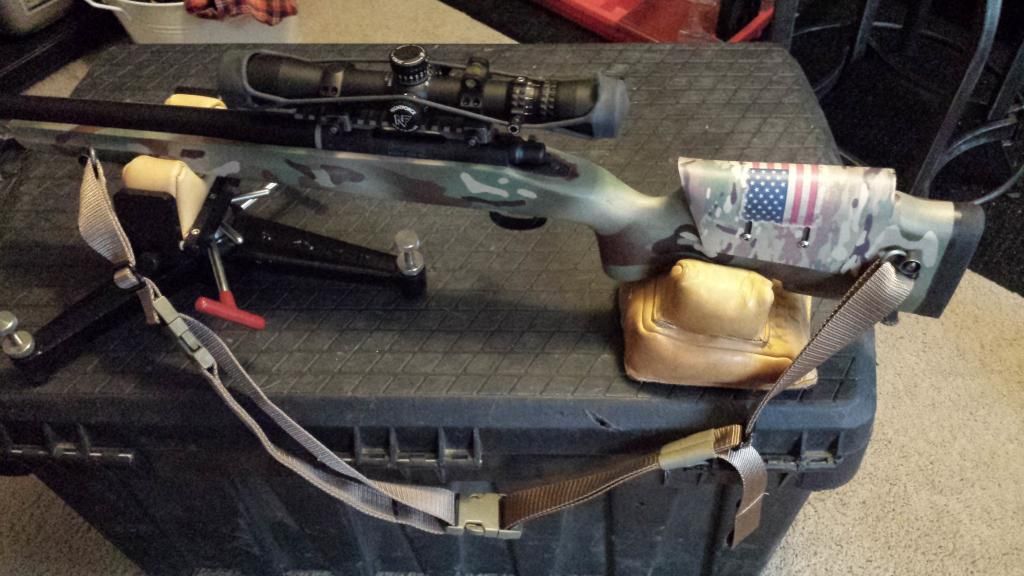
Set up with sling in place (for pics only, it won't work like that on the BR set-up):
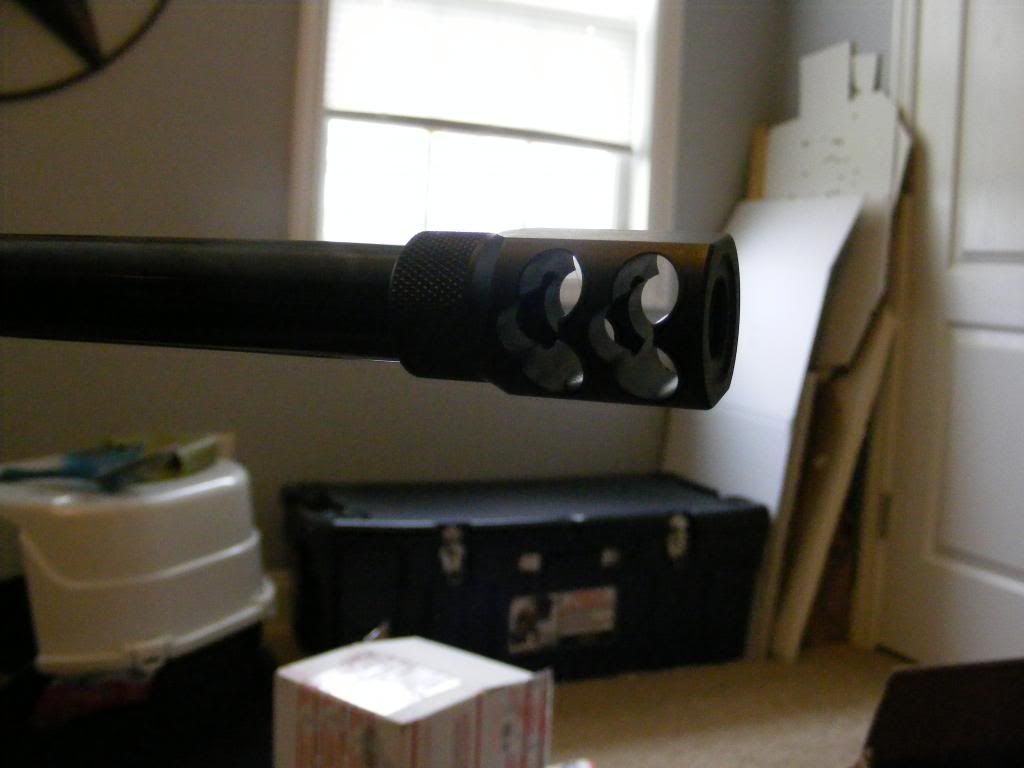
The brake I got at a match last year from Templar Customs (they use it on .458 SOCOM):
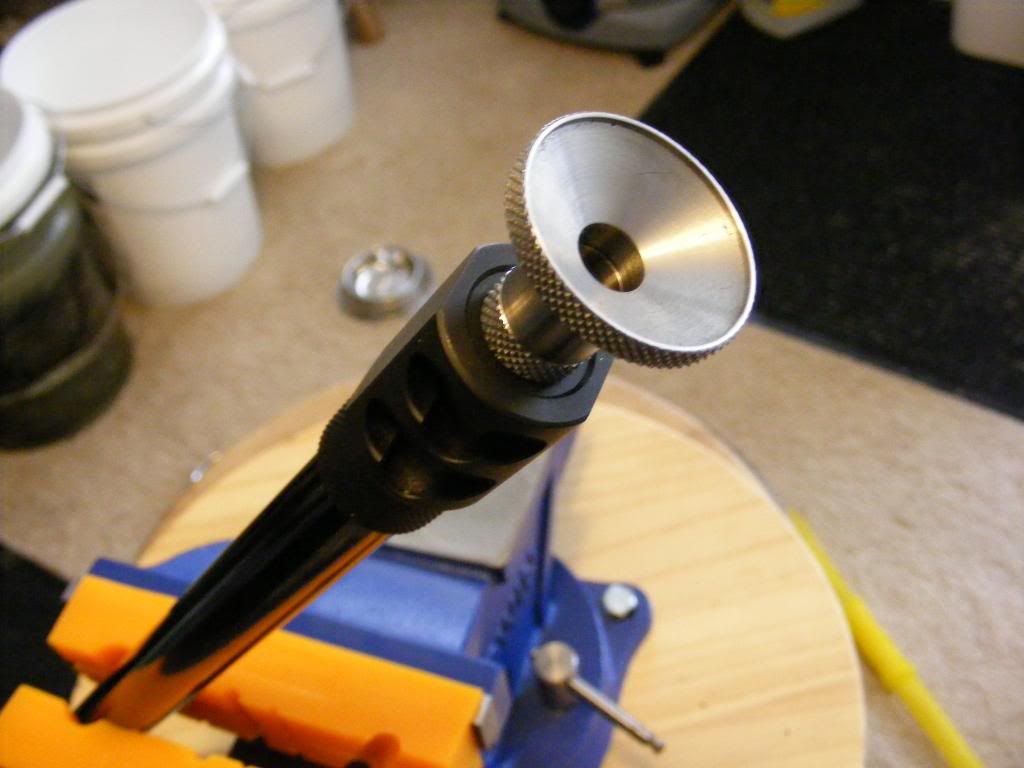
Powder/Bullet funnel:
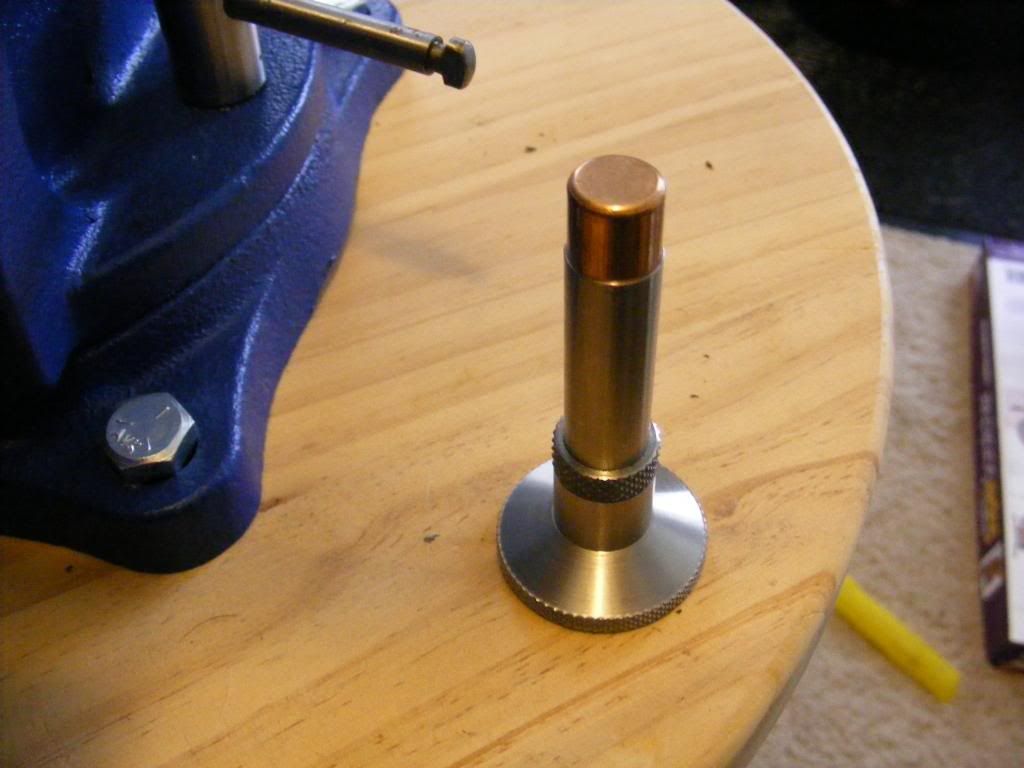
Bullet starter:
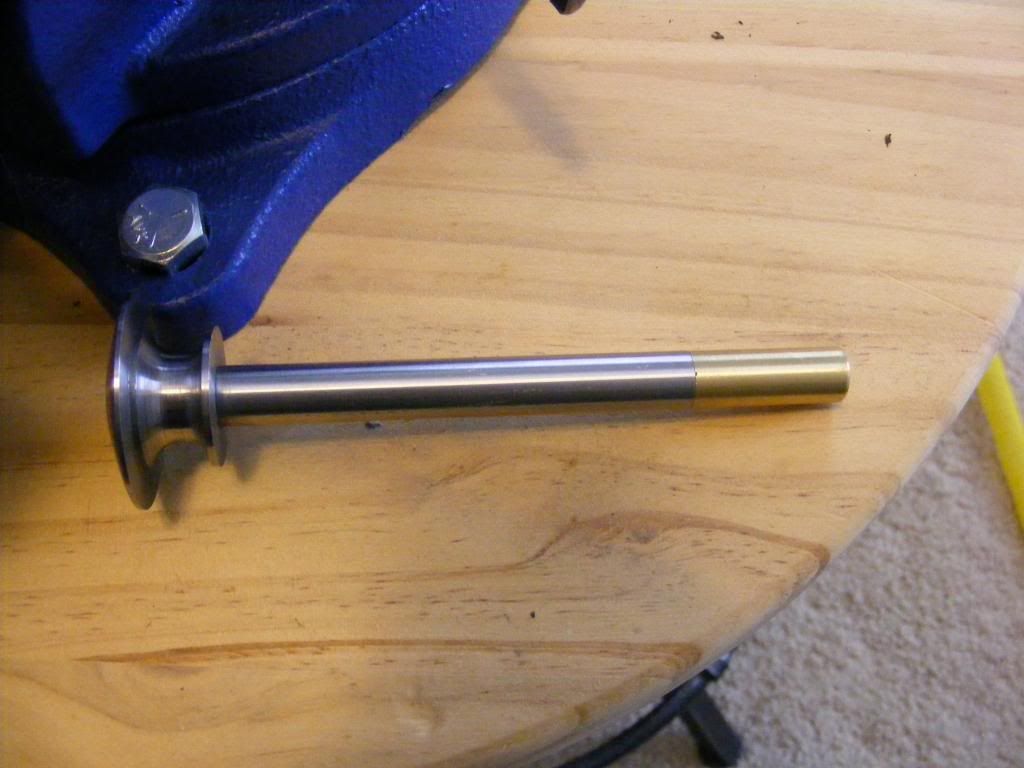
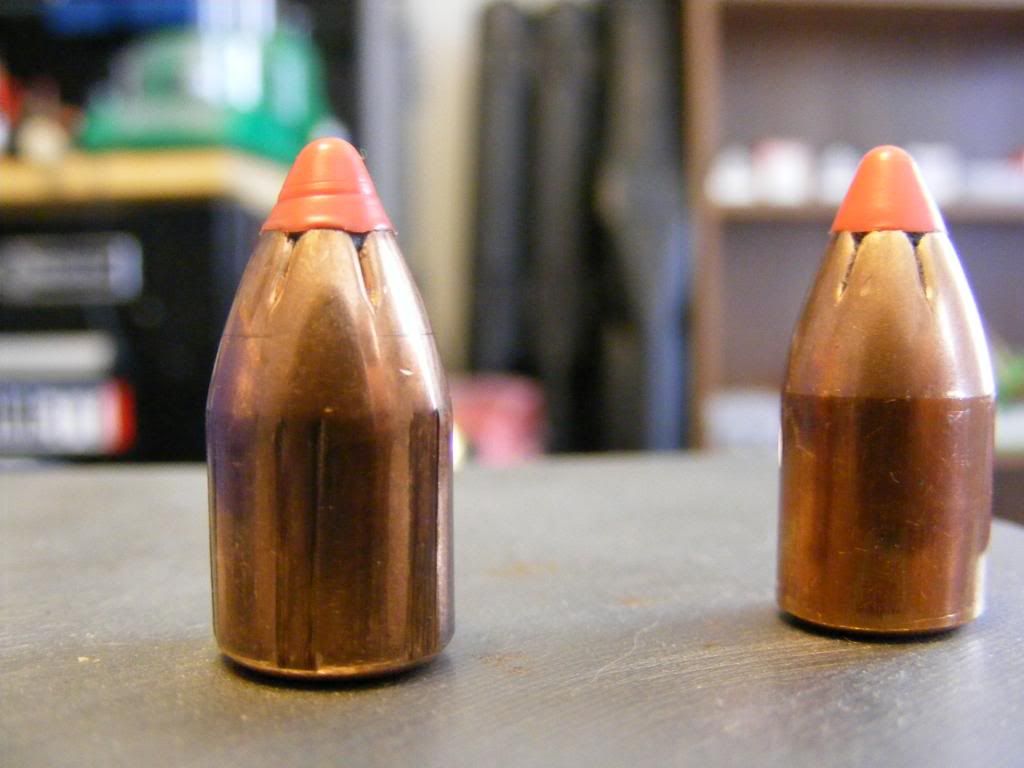
Bullets sized in the dual bushing smooth/full form die:
In support of the premise we should do more and talk less I decided to post a working thread. I am on some forced leave because of a new policy that limits the amount of leave one can accrue; that said I am not entirely off because I will be at work TUE to THUR but hey, it all works out on paper to burn these days off. I am a lot like my Border Collie and become neurotic without things to do so I have been on a work bender over the last 4 days. Being it was the weekend I re-finished a sewing desk for my wife and built a blanket ladder (you can thank Pinterest). I'll spare you the photos but, overall, it allowed me the freedom to have the weekdays to myself to complete my own projects.
This project is way over-due but I am gone a lot (Sorry, MTJ555 I know you have it worse right now) and I have to work on things every few months as I can. I chose to call this project the Green Beanie (they will understand why) in tribute to the two men who have made it possible. Matt is a local retired guy who has a gunsmith shop up the road and gives me free run of the place to do things I don't have tools for at home. Mike is a friend, brother in arms, and an artist with metal: more to follow on that when I post the complete project. I don't get to see him as freely as I would like but he has been inspirational as a man and artisan.
My wife bought me a Tacticool for my rimfire trainer an X-mas or two back. I really like the stock and bought one for this SML. The more I shoot the Tacticool the more I realize it is not quite right for me. The grip is too much and could stand some more taper from tang to wrist. The forearm is beaver-tailed and too fat for a psuedo-sporter. The Tacticool barrel channel is for a Varmint/Sendero channel and as a result left a unsightly gap around my barrel. I used a modified Douglas 5A contour on this gun so I taped the barrel and full-length bedded the gun so that when the tape was removed I had .040" of float from the recoil lug forward. To reduce the forearm I used a plane and cut the beavertail down parallel to the top edge of the forearm and all hard edges were radiused. Using the McMillan ADJ GameScout I am smitten with I sketched the reduction in the stock tang/wrist area and began to work it down with a rasp (not a great tool for laminate as it is very "chippy"). I changed over to a cabinet maker file and orbital sander. The comb is too low to allow for a good cheek-weld using a 20MOA off-set base and low Night Force rings so I molded, cut-down, and sanded a cheek-piece from Multi-Cam Kydex with an American flag to keep in tradition with the rifle's theme. Once I had it close to completion I mounted it on the stock and drilled the hardware holes though the Kydex and into the stock.
I am not anywhere near done but it was time to take a coffee break and eat second breakfast. I still need to clean up the bedding: I am headed to Matt's place at 1PM to use a mill for the chore. I still need to epoxy in the cheek-piece bushings, QD Push-button inserts, and bi-pod m1913 rail bushings. When all the prep-work is done I will primer the stock, cut the stencils, and paint the entire stock to match the cheek-piece. Was this the easiest way to get what I wanted? Absolutely not. Ordering another GameScout would have been much easier but like Bill said the other day some of us are diseased.
Tacticool stripped of textured black paint, drilled for hardware, bedded, and ready for shaping (note: you can see where the stock has cross-pins and you can't see it but at the bottom of the pistol-grip there is another plug where they epoxy a pin into the grip just like you should in wood vertical grip stock which checked off one item from my to-do list):

The bedding before clean up (the overflow was allowed so I had proud material to allow for the reshaping of the grip and to allow for a better fit of the ejection port cutout in the stock as it left a lot to be desired). The stock was ordered as an ADL since they don't offer a 40-X inlet and they only do a 700ML in a thumbhole so the mag box cutout was filled with cutdown carbon arrows (which I have broken while stump shooting with my longbow) and everything epoxied in place:

Rough sketch of grip reduction to occur and holes for cheeck-piece hardware (the comb on the Tacticool is too low for a 20MOA base with low NF rings):

Kydex cheek-piece (only .080" thick so as not to remove eye far from center-line of comb):

Tacticool in relation to GameScout which it is going to resemble soon:


I posted yesterday I spent the afternoon on the phone with insurance companies. As a result I did not make it up to Matt's shop to clean up my bedding job. In addition to running his own shop he is a gunsmith instructor at Montgomery County College (one of the five NRA certified gunsmithing colleges if anyone in NC is interested) so I work around his schedule. That means I am cleaning this up at home. I have a meeting I have to get to this evening so I only had time to cut out the trigger pin recesses this afternoon after I got home from the body shop appraisal.
You can see little pock marks where the trigger pin holes were filled to prevent a mechanical lock. They are ugly so I cut them out. Honestly, I don't know that it is necessary but it looks better:
Since I didn't have his mill I used my drill press with drill press vise and a router bit. I line up where I want the recesses and use the depth stop on the press to make as uniform a cut as possible. I make a small cut, again and again, to the desired depth so that the bit doesn't walk:

Things have slowed down a little on the gun. I got to work yesterday at 4AM and returned home last night around 2AM. When my wife got up for work at 6AM I got back up, made coffee and breakfast, then let it all settle while I watched a movie.
I got back to work on the gun around 9AM starting with cleaning up the barrel channel. I mentioned I wrapped the barrel with tape and full length bedded it to fill the barrel channel which was a gross mismatch for my contour. You can keep good tight wraps on the barrel shank and straight taper but the radius just forward of the breech gets little wrinkles and there are fine lines where the wraps of tape meet along the length of the barrel. So I put two wraps of tape the entire length of the barrel and took a strip of 150 grit aluminum oxide cloth, tightened the action down and cut back the barrel channel bedding just enough to remove blemishes then prepped it for paint.
I also removed the proud bedding material along the top stock line where the ejection port cutout formerly was a poor fit:


Grip Reduction complete and blended with the angle of the tang:

I decided not to dish out the "thumb flute" (if you will but it is not a flute in the traditional sense but it is not the wrist either) as it looks awfully thin once the grip/wrist reduction was finished. Thumb-holes are thinner I believe but they remind me of an H-brace in a fence and I think they probably distribute the recoil force better. Regardless, I stopped once it felt good enough to quit.
A few weeks back I received my breech plug tool from airborneike. Today while I was waiting on some epoxy to set I worked the BP shoulder over. I used three different cameras trying to get a good picture. This is the best I got for my efforts and shows an evenly polished shoulder:

Today's my birthday and I have been lazy most of the morning but my wife is priming and painting a desk so I decided I would do some more stock work. Here is a push-button swivel insert and swivel next to the cheek-piece. I off-set it to the upper portion of the stock because if you don't the gun will tend to tip away from you when slung because the barreled action and optic make them top heavy:

I learned that the hard way when I ordered them pre-installed on the McMillan:
The forward insert is 13" ahead of the triggerguard and lines up with where the insert in the M1913 rail on bottom goes for the bi-pod mount:

Ok, three weeks of school later I am finished and able to do something enjoyable. It's time to paint the stock on the Green Beanie. I masked the bedding, recoil pad, and plugged the threaded inserts for the cheek-piece so we don't get paint anywhere I don't want it. I then used a paint and primer color that is a grey/tan/slate color with a slight pink hue. It is a good base color for a Multi-Cam type pattern:

While it is drying I took a piece of wax paper and taped it so that the taped over lapped and drew my stencils:

Once the primer/paint combo dried I faded a flat tan into it in patches. I don't know that you can tell in the picture:

To create light spots I lay in the decals and then paint over them in a dark brown as they should be grouped together:


The blue decals will be dark chocolate colored and are paired with the grey/tan color from the picture above. I just did the reveal on the match rifle skins and they are sitting next to the Green Beanie stock. My dark brown paint wasn't playing nice with the plastic of the skins so I am going to have to go back and add it in but the Green Beanie should finish up similar to those skins.

I am going to let the brown dry overnight and tomorrow I will do the last two coats.
To get the mid fade you need a light loam green and a red brown color. The goal is about a 50-50 coverage running in stripes that have some fade to them. I run them at a diagonal so that when I come back for the next coat I can run the other direction (criss cross) to achieve a non-polarizing effect:

Now that we have a micro detail in light grey/tan and dark brown and macro detail in loam green and red brown we need larger pattern stencils:

Thanks for the compliments guys. My wife says this looks really tedious but I get in the zone and it seems to go by quickly. I only work on it for a few minutes at a time then wait a few hours and have another go at it.
Macro detail in place over mid fade:

And final fade is tan, olive drab green, and another weird but slightly brighter loam green:

All decals removed you have something that looks similar to Multi-Cam:


Now, I am clear coating it to flatten out the shine and protect all the edges where paint colors come together and have a tiny seam. After that I will un-mask the bedding.
All the tape is gone and the stock is matte clear coated. Just needs to sit in the garage a while to ensure that the paint is completely dry and tack free:

The Green Beanie is finished.
Quick Re-Cap:
Remington 700ML with Hunter Bolt Nose Kit
PT&G .187" stainless lug
McGowen CM 1-24" .442/.451" barrel in a modified Douglas 5A contour crowned at 23", threaded for a muzzle-break
Trigger is blueprinted factory and adjusted to 2.25#
All CM parts are finished in Graphite Black Cerakote
Scope base is Murphy Ti 10 MOA (Devcon bedded, screws siliconed and torqued to 25 in*lbs)
Boyd's Tacticool (modified and pillar/glass bedded)
Sorry for the poor pictures but the weather is terrible this morning and I didn't feel like getting wet or cleaning guns that got rained on. Here it is on the benchrest equipment. The rifle in front of it is there because in all of the pictures of the Beanie's stock you could see the skins from that chassis getting painted as well:

Cheek-piece mounted and Push-Button QD insert:

Set up with sling in place (for pics only, it won't work like that on the BR set-up):


The brake I got at a match last year from Templar Customs (they use it on .458 SOCOM):

Powder/Bullet funnel:


Bullet starter:

Bullets sized in the dual bushing smooth/full form die:


